FREE SHIPPING when you spend $500+
Below $500: Flat rate of $14.99 for shipping.
Track Your OrderNeed Help? Call Us: 918-512-1281
- FOR THE DRIVER
- FOR THE PIT/SHOP
- FOR THE CAR
- GEAR & MERCH
Free shipping when you spend $500+
FREE SHIPPING when you spend $500+
Below $500: Flat rate of $14.99 for shipping.
Free shipping when you spend $500+
So you’ve just purchased a race/track car from a friend or other contact. Or you have a donor car that you now want to turn into a dedicated track car or perhaps convert to a fully caged race car, and you want to know what rate of spring to run in this car. Selecting the correct rate of spring for your car and/or driving style can be a daunting task. We intend to simplify it here.
Selecting a spring rate is really the starting point for most car set up and it is possible to get bogged down in the weeds with all kinds of math that for our purposes we really don’t need. The content discussed here is intended to get us a good starting point. The first set of springs you choose probably won’t be your last. It is a somewhat iterative process and this will help you start your tuning process.
To get started there are some data points we’ll need for the spring rate:
After we get this data we will plug them into a few equations below.
The easiest way to get the total weight of the vehicle is to place your car on a set of weighing scales. If you don t have your own scales you may be able to find a shop near you that has a set, or most tracks will have a set of weighing scales they will use in Tech as part of impound as cars come of the track. The next time at the track you may be able to ask the person leading Tech if you can get some basic numbers from them. If you don’t have access to a set of scales you can search online and get the front and rear axles weights for your make/model of car.
Using real world numbers. Our 1991 Spec Miata weighs 1208lbs front and 1154lbs rear.
The unsprung weight is the weight of the suspension and connected elements, such as wheels and tires. To get the unsprung mass we can measure it by raising the vehicle and supporting it. Then let the suspension hang free (disconnect coil over from the chassis) and place a scale under the free hanging suspension and measure the weight.
We will subtract this number from the sprung mass value we measured above. For our Miata we are using 45lbs.
Going a bit into the physics. Suspensions are a spring/damper system. Springs support the vehicle and minimize the affects of transients in the road surface such as bumps and potholes. Dampers (shocks) help to minimize the “bouncing” of the springs. Without shocks the car would bounce up and down indefinity as it travelled down the road. (Consider that “old school” Crown Vic you see bouncing up and down going down the freeway. It’s shocks are “spent” and providing no more damping force). The spring/damper system have a natural frequency. If you compress and release the spring it will bounce with a certain frequency. To learn more about the physics of spring/damper systems you can view this link.
The list below provides well documented frequencies for most suspension types:
For our purposes we will assume we have a production car that we are intending to use for dedicated track use, so comfort is not as much of a concern. A good starting point for a low downforce production car for track use is 2Hz. If the car has added aero such as front air dam/splitter, rear diffuser and/or wing, then you may want to choose a number slightly higher than 2Hz. (More on this later). If you also intend to use this car on the street then you may want to choose a slightly lower number. (The higher the number the stiffer the suspension will be. Conversely, the lower the number the softer the suspension will be).
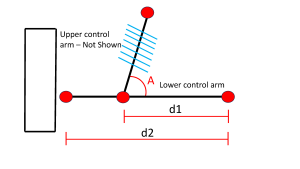
Motion ratio is the ratio of wheel movement at the track surface relative to spring movement within the coil over. This is because the spring is mounted inside of the outer ball joint (see diagram) and because on production cars the coil overs are not mounted exactly 90 degrees to the road surface. Motion ratio is wheel travel divided by spring travel.
Motion Ratio = (d2/d1) * cos a
Where,

For most production car the layover of the coil over is less than 10 degrees. Cos 10 degrees is 0.985, or 1.5%. This has a relatively minimal impact on our numbers. If you still are intent on including this angle in your equation, an alternative method is to measure for it. Note: We disregard the contribution of coil over angle in the below computations.
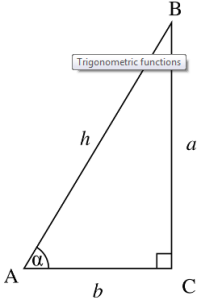
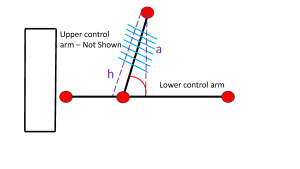
From trigonometry cos A is the ratio of the adjacent side to the hypotenuse. Or a/h. 
Since measuring the angle of the coil over may be non-trivial, an easier method is to measure the distance from the top of the coil over to the lower control arm. You can use string with a bolt hanging from the bottom of it so its acting as a plumb. This is distance a. Then measure essentially the length of the coil over. From the top of the coil over to its lower mount point on the lower control arm. This is distance h. Take a/h, and you’ve essentially done the cos A.

After your calculations the Motion Ratio should be a number slightly larger than 1. For our Miata we measured d1 and d2 at the rear and got 12.5″ and 16″, respectively. This yields a rear motion ratio of 1.28.
Now that we have the data we need we can start plugging these numbers into some equations. First we need wheel rate. Wheel rate is the effective stiffness of the suspension system measured at the wheel center.
Wheel Rate = Sprung Mass * 4pi^2 * f^2.
Where,
For the equations below we need to convert the imperial units of lbs to kilograms. (1lb = 0.453kg).
From our example 1991 Spec Miata. On scales we measured 1208lbs front and 1154lbs rear. Dividing these numbers by two we get the sprung mass at each wheel.
Subtracting off the unsprung weight. We are using 45lbs for our Miata. This gives us front 640lbs – 45lbs = 595lbs, rear 577lbs – 45lbs = 532lbs.
Converting to SI units we get (1lb = 0.453kg).
Plugging in these numbers from our equation above,
Wheel Rate = Sprung Mass * 4pi^2 * f^2 = front, 269kg * 4pi^2 * 2^2 = 269kg * (39.47) * 4 = 42,479 N/m.
Newtons per meter is not very helpful for selecting a spring. Newtons per millimeter is more common. Diving this value by 1,000 yields 42.79 N/mm.
Now we need to take into consideration the motion ratio. This is the ratio of wheel movement to spring movement. To get this desired wheel rate will require a slightly stiffer spring.
For our Miata above we got a rear motion ratio of 1.28
Spring Rate = Wheel Rate * MR^2.
Plugging in our numbers we get = 42.79 * (1.28)*2 = 42.79 * 1.6384 = 70.45 N/mm
For our spring we need to find a rear spring that is near 70.45 N/mm, or converting to lbs/inch (1 N/mm = 5.7 lbs/in) yields, 401.565 lbs/inch. Many spring vendors use both SI units and Imperial units. You probably won’t find a spring that is exactly this value, but you should be able to get close.
For our equations above the undamped natural frequency we selected was 2 Hz for both front and rear. Developed from the world of passengers cars, where comfort is the goal, is the concept of “flat ride”. With both front and rear frequencies the same the front and rear can get “out of phase” from each other. As the front hits a transient in the road, bump or pothole, the rear can get out of phase with the front resulting in pitching of the chassis. Many passenger cars use a 10-20% split between front and rear frequencies with the rear being higher to allow the rear to “catch up” with the front.
The value we chose above provides us a starting point. From here we want to tune. Driving style also comes into affect. Our gage is are we faster? Do we exit corners higher in the RPM range? Are we upshifting sooner heading to our next brake zone? This is our measure.
You’ll hear talk in the paddock. “Run stiffer springs”. “Run softer springs”.
In general, running stiffer allows a lower ride height which lowers the CG (Center of Gravity) aiding in lessening lateral load transfer.
Higher spring rates also provide a firmer feel, and reduces body roll and body lean (also aiding in lessening camber variation). Stiffer springs are better on a smooth track where “bottoming out” is not a concern.
For aero sensitive vehicles with air dams/splitter, diffusers, rear wings, etc. stiffer springs allow for a lower ride height so less air passes under the vehicle. Also these springs will compress less when loaded (downforce) so there is less variation in ride height allowing the aero to do its job.
If springs are too stiff your tires will “skate” over bumps (leaving the track surface) and won’t be able to do their job correctly.
Lower spring rates will provide more overall mechanical grip. Softer springs may be good for a car with less aero. Running softer is also good when at a bumpy track, think Sebring.
The equations above provide us a good starting point to get our spring rates close. From here its tuning, analyzing what the car is doing in the corner phases, and asking the driver how he/she feels. We also have sway bars, shocks and tire pressure to help us tune.
In general,
Above all, have fun!
***
Call To Grid was created to serve the grassroots racer! We offer only the most premier brands for the driver, car, and shop to help keep you safe, looking good and on the podium! We develop original content to help you and the car find speed! We know why you race; it’s the desire, discipline and determination required to do something well. It’s the camaraderie you experience at the track with people who share this passion of motorsports! Join us at Call to Grid to join the community of passionate drivers like yourself today!