FREE SHIPPING when you spend $500+
Below $500: Flat rate of $14.99 for shipping.
Track Your OrderNeed Help? Call Us: 918-512-1281
- FOR THE DRIVER
- FOR THE PIT/SHOP
- FOR THE CAR
- GEAR & MERCH
Free shipping when you spend $500+
FREE SHIPPING when you spend $500+
Below $500: Flat rate of $14.99 for shipping.
Free shipping when you spend $500+
Before making any chassis adjustments we first need to identify if the handling issue is driver induced or chassis induced. Here are a few simple rules to help us identify this. We’ve addressed any issues that are driver induced in this video. This content will address any handling issues that we can fix with some adjustments to the chassis.
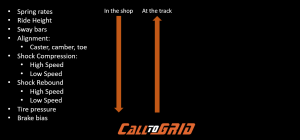
In the chart shown below we’ve sorted the major chassis areas to adjust sorted from the more difficult to make displayed on top, to the easier to make on the bottom. When we are in the shop preparing the car we will typically start from the top and work our way down. At the track we will start from the bottom and work our way up.
A downloadable version of this is available here: Download File.

If we are at the track and we’ve discovered some chassis issues, or maybe we are just trying to find more speed we can use this chart to give us a place to start.
This will typically be seen on corner entry when the driver is on the brakes. If we have a brake bias valve this is a simple, easy adjustment to make at the track. If we don’t have a brake bias valve we can tune the brakes by experimenting with different brake pad compounds (i.e. a less torquey or more torquey brake pad). An easy change to make at the track. Or you can experiment with diameter of brake lines producing either a more progressive or more linear brake feel. This will typically be done back in the shop however.
Many teams don’t have a brake bias valve and changing brake pads at the track may be a bit time consuming. Tire pressure is really one of the more simple changes we can make when we are at the track. If your chassis is already pretty close this is typically where you may spend the most time tuning the chassis on a track weekend.
Another simple area to tweak at the track is shock and damper settings if your chassis is already pretty close.
Sway bars affect the amount of load transfer you experience. You have a physical connection from the inside tire to the outside tire. A stiffer bar results in more load transfer to the outside tire mid-corner. This takes load off the inside tire resulting in less overall grip for that axle. Stiffer bar on the front, relative to the rear, will tend to more understeer. A stiffer bar on the rear, relative to the front, will tend towards oversteer. Softer front sway bar relative to the rear will tend to give you more rotation as you enter a corner.
We hope these provide you some guidance on what to modify and which direction. Don’t try small changes (the change won’t be large enough to sense on track), yet also don’t make them too large. For tire pressure try a couple pounds. If you saw improvement, try a couple more pounds until things get worse. Then back off to the previous setting. For shocks try two-clicks or a 1/4 turn. Obviously there are many variables to consider. At the grassroots level the driver will gain confidence as the day goes on. Track and ambient temperature also matter. These change. It helps to keep a good log book showing the settings you are using and the weather and track conditions. “There is no free lunch” as Carroll Smith says.
Call to Grid was created to serve the grassroots racer! We offer only the most premier brands for the driver, car, and shop to help keep you safe, looking good and on the podium! We develop original content to help you and the car find speed! We know why you race; it’s the desire, discipline and determination required to do something well. It’s the camaraderie you experience at the track with people who share this passion of motorsports! Join us at Call to Grid to join the community of passionate drivers like yourself today!